실습3(This webhook is for mutating pods that will require AWS IAM access)

- For the webhook to inject a new Token into our Pod, we are going to create a new Kubernetes Service Account, annotate our Service Account with an AWS IAM role ARN, and then reference this new Kubernetes Service Account in a Kubernetes Pod. The eksctl tool can be used to automate a few steps for us, but all of these steps can also be done manually.
- The eksctl create iamserviceaccount command creates:
- A Kubernetes Service Account
- An IAM role with the specified IAM policy
- A trust policy on that IAM role
- Finally, it will also annotate the Kubernetes Service Account with the IAM Role Arn created.
# Create an iamserviceaccount - AWS IAM role bound to a Kubernetes service account
eksctl create iamserviceaccount \\
  --name my-sa \\
  --namespace default \\
  --cluster $CLUSTER_NAME \\
  --approve \\
  --attach-policy-arn $(aws iam list-policies --query 'Policies[?PolicyName==`AmazonS3ReadOnlyAccess`].Arn' --output text)

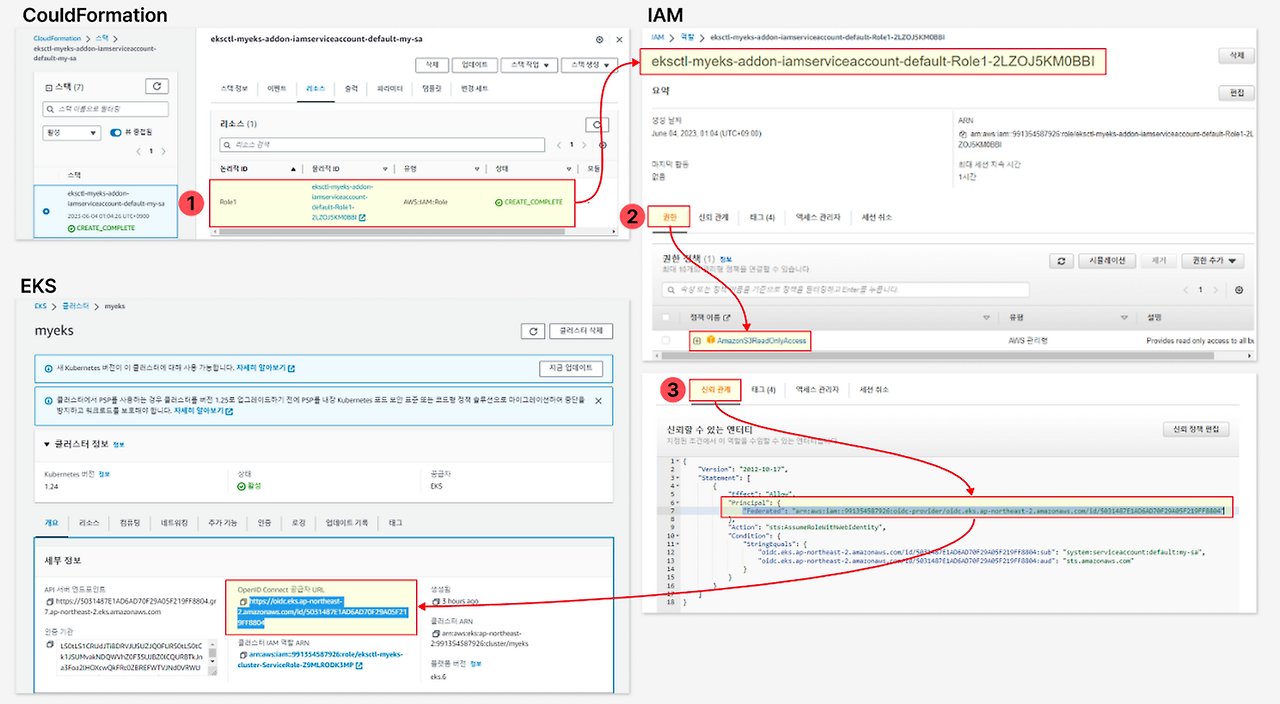
# 확인 >> 웹 관리 콘솔에서 CloudFormation Stack >> IAM Role 확인
# aws-load-balancer-controller IRSA는 어떤 동작을 수행할 것 인지 생각해보자!
eksctl get iamserviceaccount --cluster $CLUSTER_NAME

kubectl get sa
kubectl describe sa my-sa


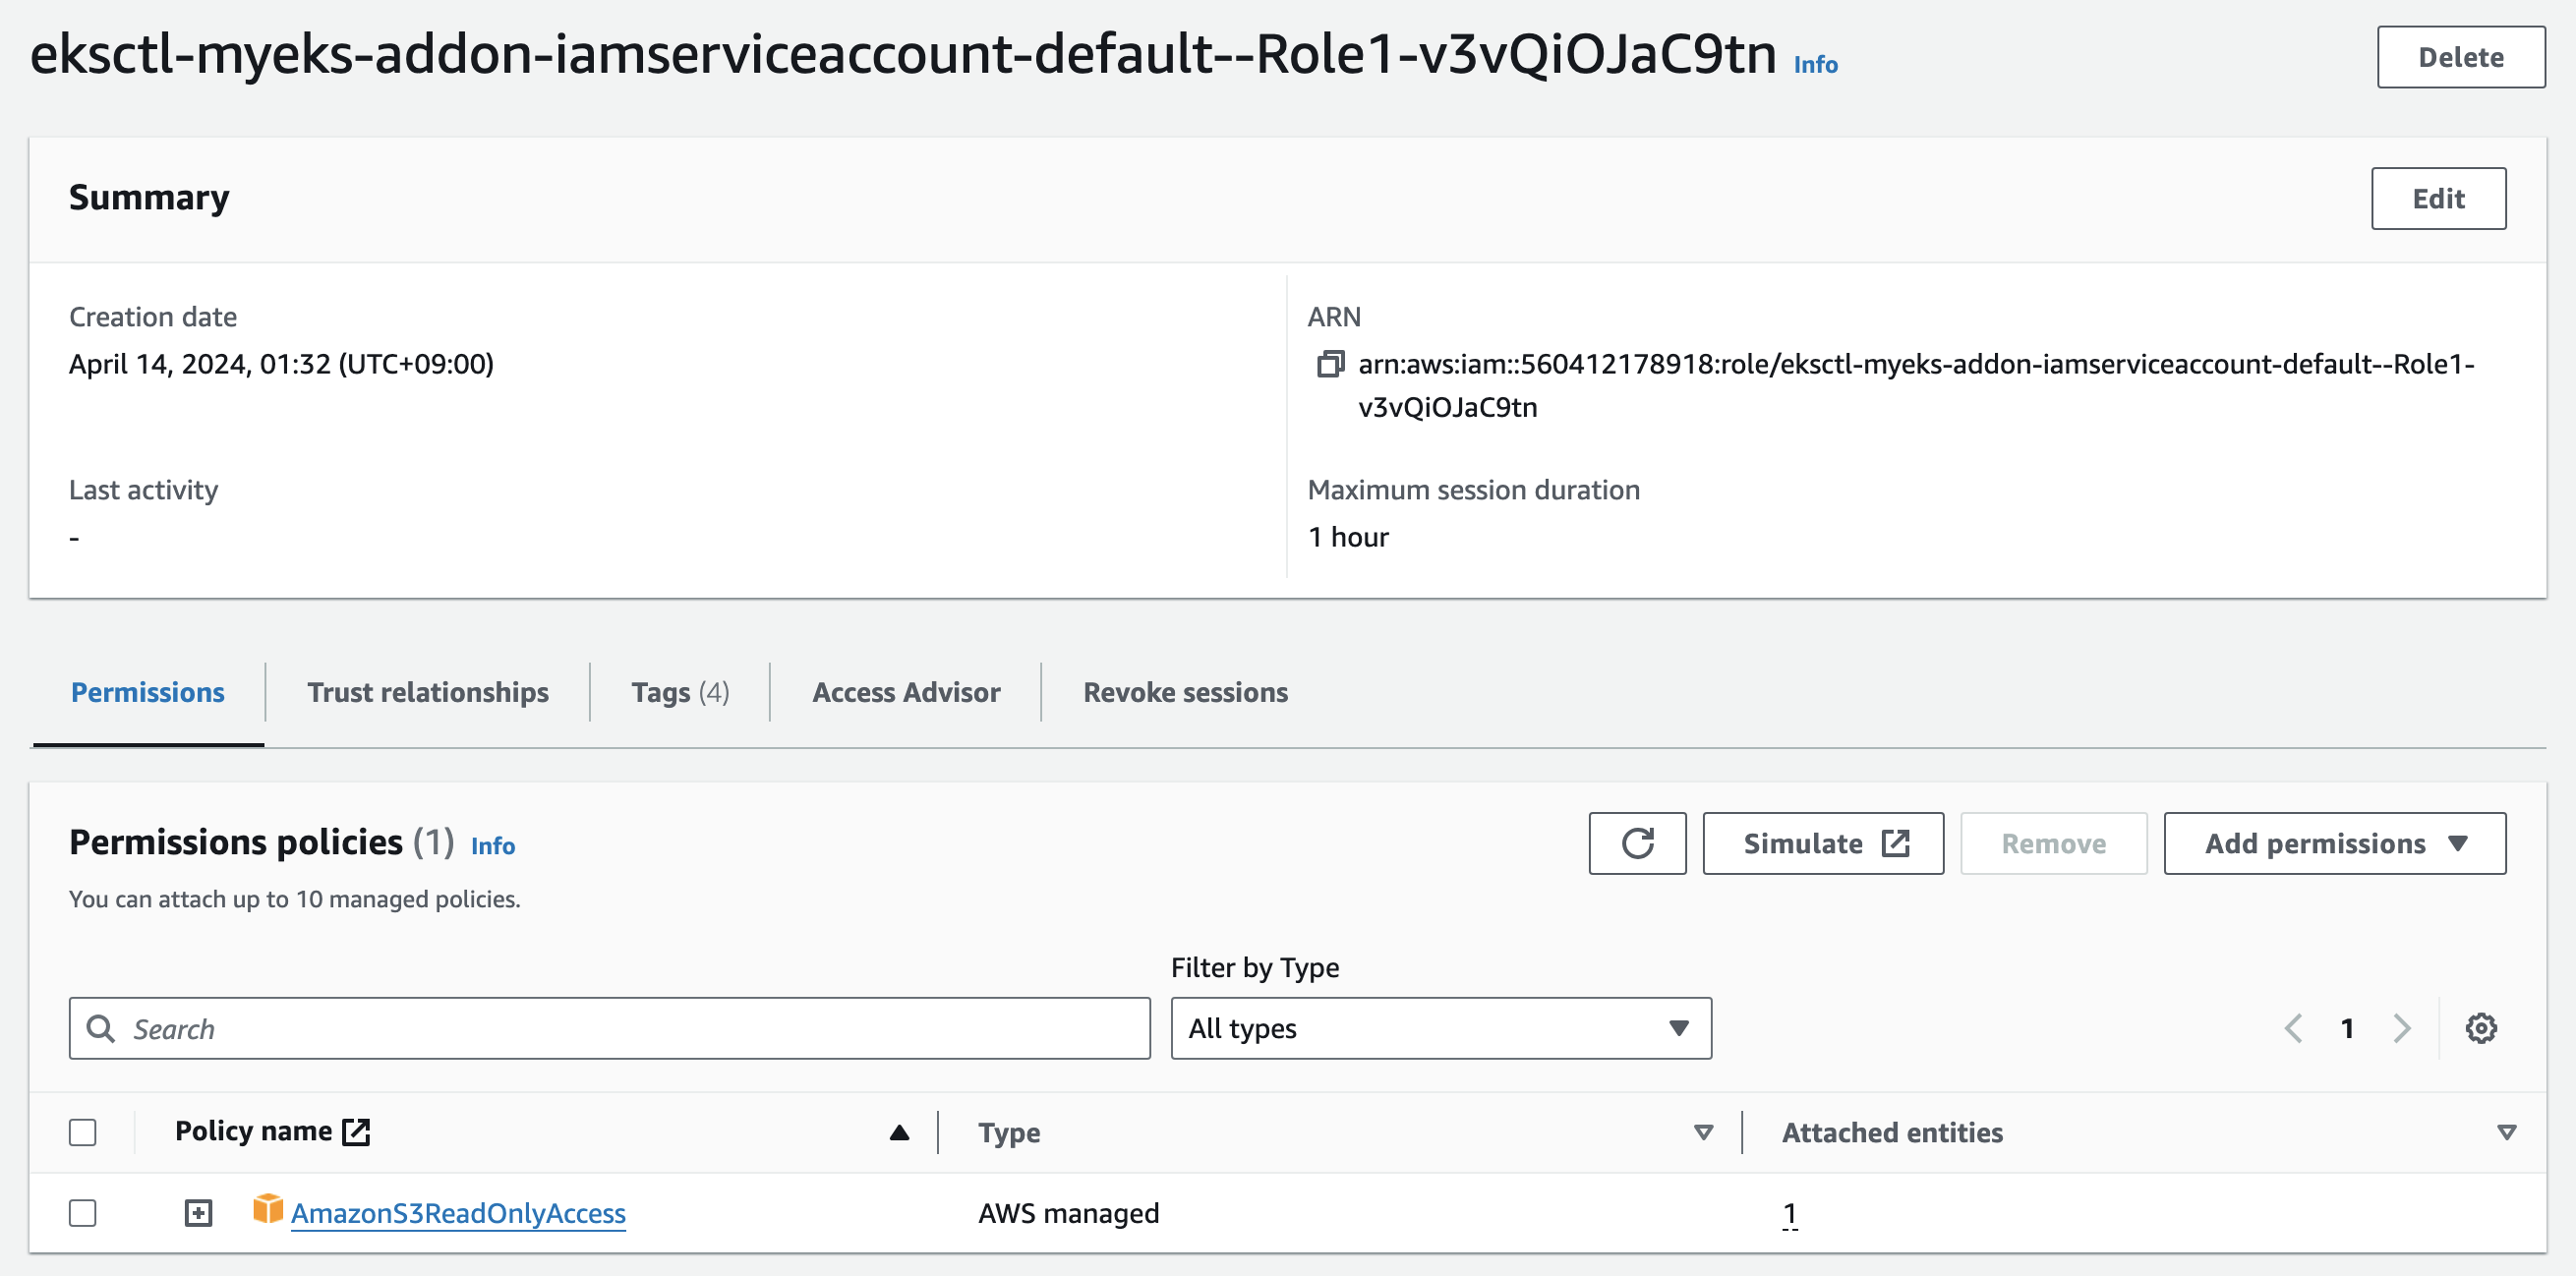
- Let’s see how this IAM role looks within the AWS Management Console. Navigate to IAM and then IAM Roles and search for the role. You will see the Annotations field when you describe your service account. ⇒ IAM Role 확인
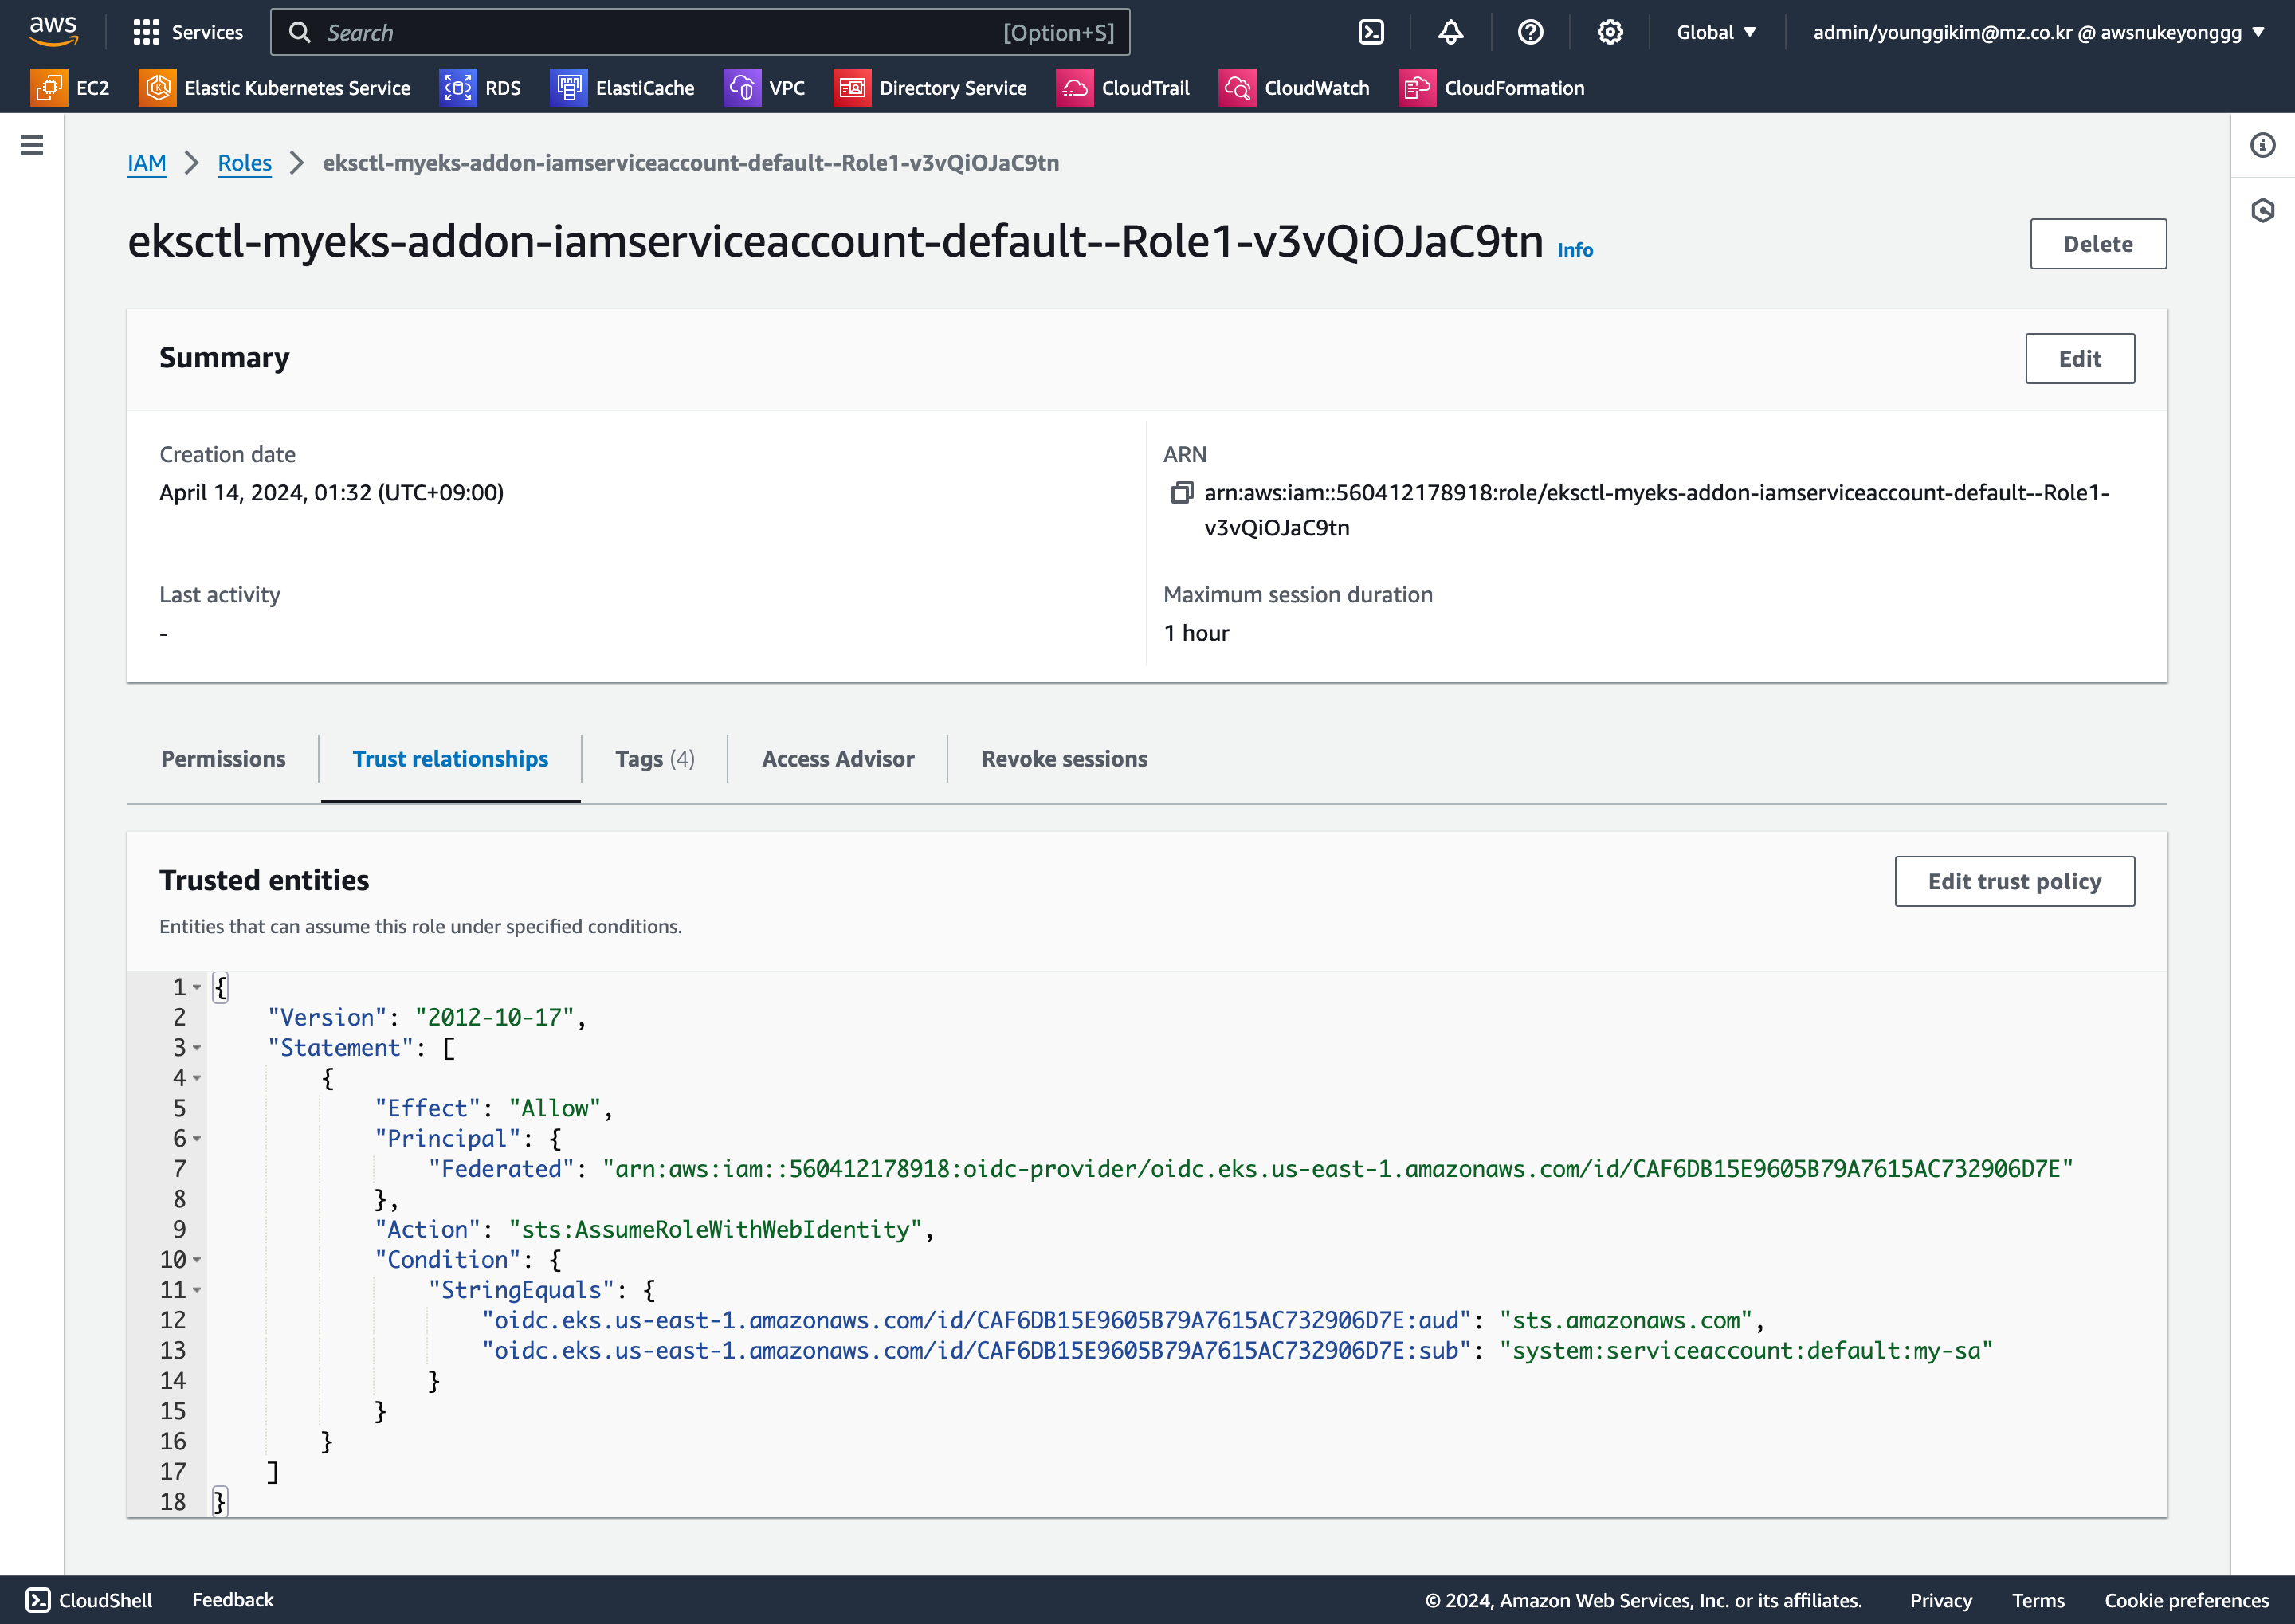
- Select the Trust relationships tab and select Edit trust relationship to view the policy document.
- You can see that this policy is allowing an identity system:serviceaccount:default:my-sa to assume the role using sts:AssumeRoleWithWebIdentity action. The principal for this policy is an OIDC provider.
{
    "Version": "2012-10-17",
    "Statement": [
        {
            "Effect": "Allow",
            "Principal": {
                "Federated": "arn:aws:iam::911283464785:oidc-provider/oidc.eks.ap-northeast-2.amazonaws.com/id/F6A7523462E8E6CDADEE5D41DF2E71F6"
            },
            "Action": "sts:AssumeRoleWithWebIdentity",
            "Condition": {
                "StringEquals": {
                    "oidc.eks.ap-northeast-2.amazonaws.com/id/F6A7523462E8E6CDADEE5D41DF2E71F6:sub": "system:serviceaccount:default:my-sa",
                    "oidc.eks.ap-northeast-2.amazonaws.com/id/F6A7523462E8E6CDADEE5D41DF2E71F6:aud": "sts.amazonaws.com"
                }
            }
        }
    ]
}
- Now let’s see what happens when we use this new Service Account within a Kubernetes Pod : 신규 파드 만들자!
# 파드3번 생성
cat <<EOF | kubectl apply -f -
apiVersion: v1
kind: Pod
metadata:
  name: eks-iam-test3
spec:
  serviceAccountName: my-sa
  containers:
    - name: my-aws-cli
      image: amazon/aws-cli:latest
      command: ['sleep', '36000']
  restartPolicy: Never
  terminationGracePeriodSeconds: 0
EOF

# 해당 SA를 파드가 사용 시 mutatingwebhook으로 Env,Volume 추가함
kubectl get mutatingwebhookconfigurations pod-identity-webhook -o yaml | kubectl neat | yh

# 파드 생성 yaml에 없던 내용이 추가됨!!!!!
# Pod Identity Webhook은 mutating webhook을 통해 아래 Env 내용과 1개의 볼륨을 추가함
kubectl get pod eks-iam-test3
kubectl get pod eks-iam-test3 -o yaml | kubectl neat | yh

kubectl exec -it eks-iam-test3 -- ls /var/run/secrets/eks.amazonaws.com/serviceaccount

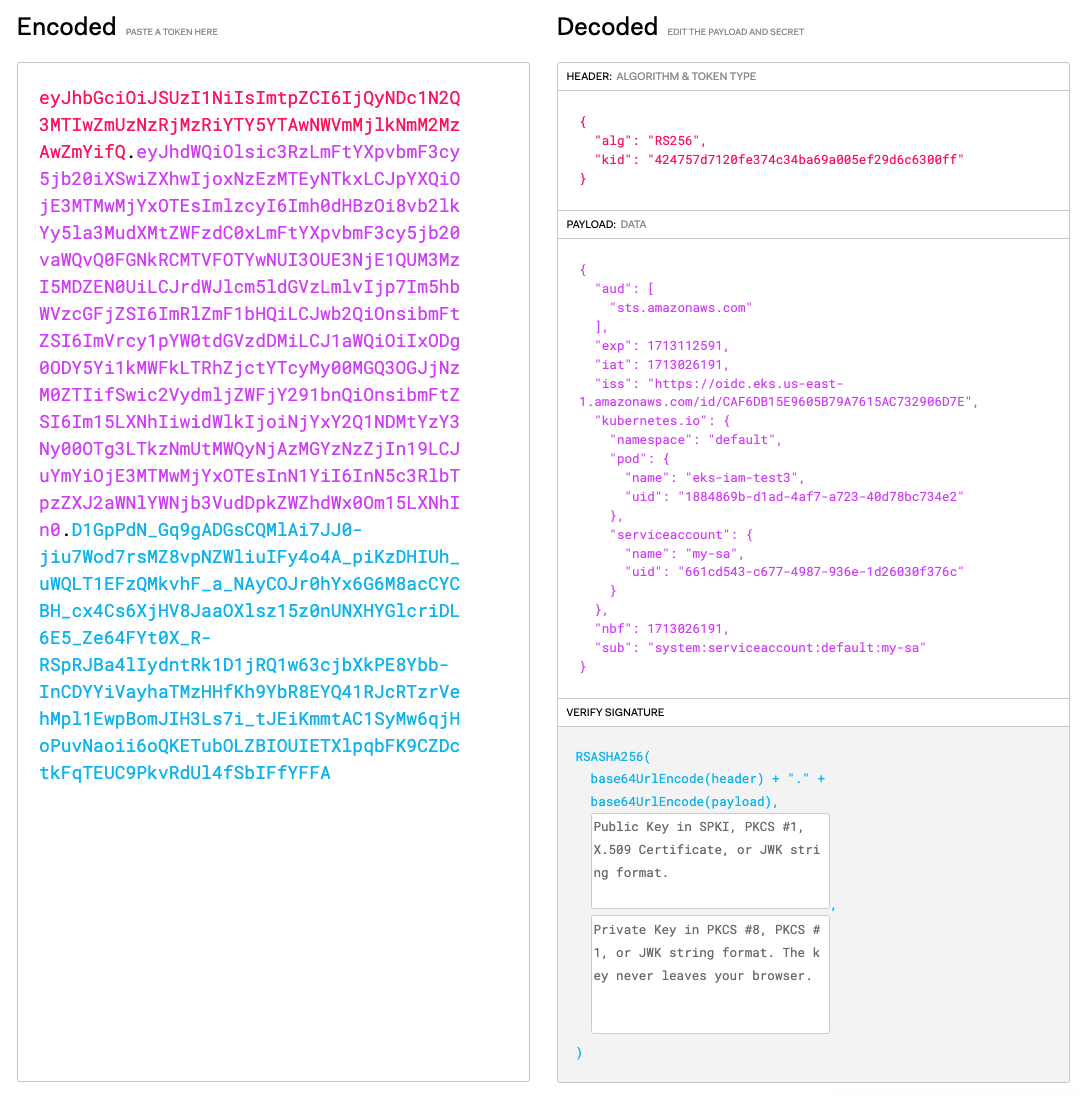
kubectl exec -it eks-iam-test3 -- cat /var/run/secrets/eks.amazonaws.com/serviceaccount/token ; echo

eyJhbGciOiJSUzI1NiIsImtpZCI6IjQyNDc1N2Q3MTIwZmUzNzRjMzRiYTY5YTAwNWVmMjlkNmM2MzAwZmYifQ.eyJhdWQiOlsic3RzLmFtYXpvbmF3cy5jb20iXSwiZXhwIjoxNzEzMTEyNTkxLCJpYXQiOjE3MTMwMjYxOTEsImlzcyI6Imh0dHBzOi8vb2lkYy5la3MudXMtZWFzdC0xLmFtYXpvbmF3cy5jb20vaWQvQ0FGNkRCMTVFOTYwNUI3OUE3NjE1QUM3MzI5MDZEN0UiLCJrdWJlcm5ldGVzLmlvIjp7Im5hbWVzcGFjZSI6ImRlZmF1bHQiLCJwb2QiOnsibmFtZSI6ImVrcy1pYW0tdGVzdDMiLCJ1aWQiOiIxODg0ODY5Yi1kMWFkLTRhZjctYTcyMy00MGQ3OGJjNzM0ZTIifSwic2VydmljZWFjY291bnQiOnsibmFtZSI6Im15LXNhIiwidWlkIjoiNjYxY2Q1NDMtYzY3Ny00OTg3LTkzNmUtMWQyNjAzMGYzNzZjIn19LCJuYmYiOjE3MTMwMjYxOTEsInN1YiI6InN5c3RlbTpzZXJ2aWNlYWNjb3VudDpkZWZhdWx0Om15LXNhIn0.D1GpPdN_Gq9gADGsCQMlAi7JJ0-jiu7Wod7rsMZ8vpNZWliuIFy4o4A_piKzDHIUh_uWQLT1EFzQMkvhF_a_NAyCOJr0hYx6G6M8acCYCBH_cx4Cs6XjHV8JaaOXlsz15z0nUNXHYGlcriDL6E5_Ze64FYt0X_R-RSpRJBa4lIydntRk1D1jRQ1w63cjbXkPE8Ybb-InCDYYiVayhaTMzHHfKh9YbR8EYQ41RJcRTzrVehMpl1EwpBomJIH3Ls7i_tJEiKmmtAC1SyMw6qjHoPuvNaoii6oQKETubOLZBIOUIETXlpqbFK9CZDctkFqTEUC9PkvRdUl4fSbIFfYFFA
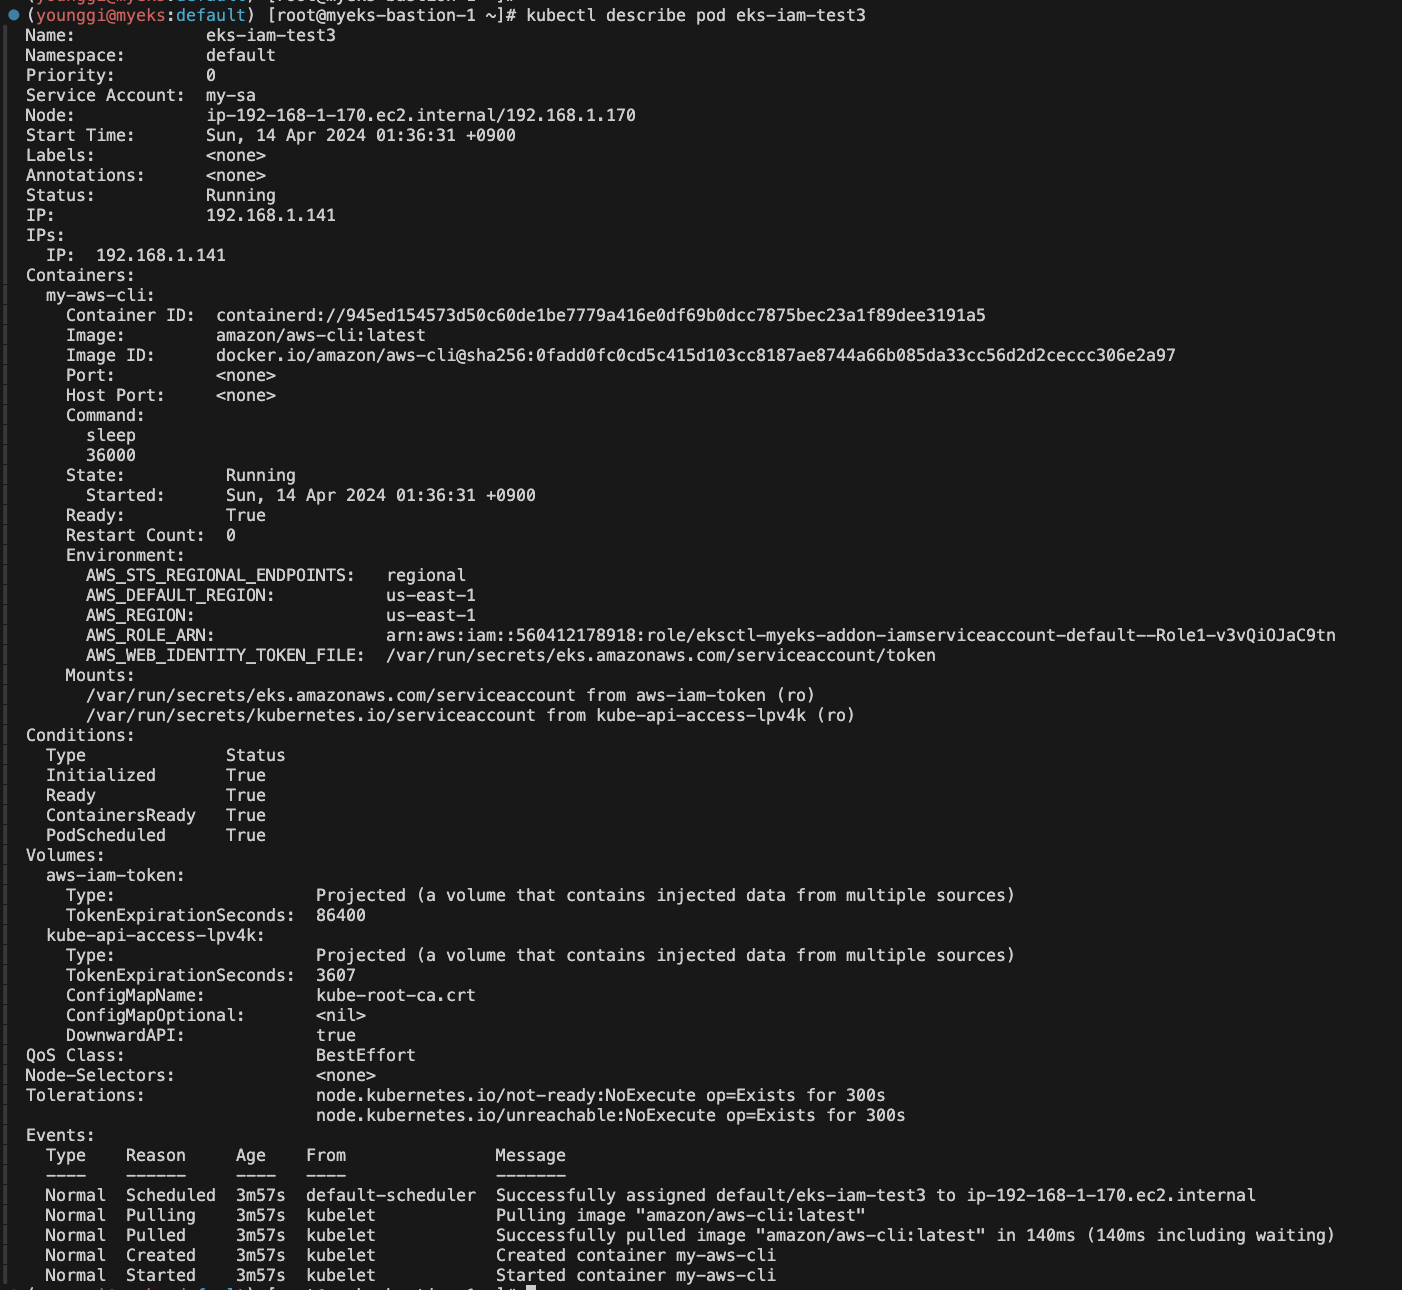
kubectl describe pod eks-iam-test3
# 파드에서 aws cli 사용 확인
eksctl get iamserviceaccount --cluster $CLUSTER_NAME
kubectl exec -it eks-iam-test3 -- aws sts get-caller-identity --query Arn
"arn:aws:sts::911283464785:assumed-role/eksctl-myeks-addon-iamserviceaccount-default-Role1-GE2DZKJYWCEN/botocore-session-1685179271"


# 되는 것고 안되는 것은 왜그런가?
kubectl exec -it eks-iam-test3 -- aws s3 ls
kubectl exec -it eks-iam-test3 -- aws ec2 describe-instances --region ap-northeast-2
kubectl exec -it eks-iam-test3 -- aws ec2 describe-vpcs --region ap-northeast-2


안되는 이유

- If we inspect the Pod using Kubectl and jq, we can see there are now two volumes mounted into our Pod. The second one has been mounted via that mutating webhook. The aws-iam-token is still being generated by the Kubernetes API Server, but with a new OIDC JWT audience.
# 파드에 볼륨 마운트 2개 확인
kubectl get pod eks-iam-test3 -o json | jq -r '.spec.containers | .[].volumeMounts'

# aws-iam-token 볼륨 정보 확인 : JWT 토큰이 담겨져있고, exp, aud 속성이 추가되어 있음
kubectl get pod eks-iam-test3 -o json | jq -r '.spec.volumes[] | select(.name=="aws-iam-token")'

# api 리소스 확인
kubectl api-resources |grep hook

kubectl explain mutatingwebhookconfigurations

kubectl get MutatingWebhookConfiguration

# pod-identity-webhook 확인
kubectl describe MutatingWebhookConfiguration pod-identity-webhook
kubectl get MutatingWebhookConfiguration pod-identity-webhook -o yaml | yh


- If we exec into the running Pod and inspect this token, we can see that it looks slightly different from the previous SA Token.
- You can see that the intended audience for this token is now sts.amazonaws.com, the issuer who has created and signed this token is still our OIDC provider, and finally, the expiration of the token is much shorter at 24 hours. We can modify the expiration duration for the service account using eks.amazonaws.com/token-expiration annotation in our Pod definition or Service Account definition.
- The mutating webhook does more than just mount an additional token into the Pod. The mutating webhook also injects environment variables.
# AWS_WEB_IDENTITY_TOKEN_FILE 확인
IAM_TOKEN=$(kubectl exec -it eks-iam-test3 -- cat /var/run/secrets/eks.amazonaws.com/serviceaccount/token)
echo $IAM_TOKEN

# env 변수 확인
kubectl get pod eks-iam-test3 -o json | jq -r '.spec.containers | .[].env'

- Now that our workload has a token it can use to attempt to authenticate with IAM, the next part is getting AWS IAM to trust these tokens. AWS IAM supports federated identities using OIDC identity providers. This feature allows IAM to authenticate AWS API calls with supported identity providers after receiving a valid OIDC JWT. This token can then be passed to AWS STS AssumeRoleWithWebIdentity API operation to get temporary IAM credentials.
- The OIDC JWT token we have in our Kubernetes workload is cryptographically signed, and IAM should trust and validate these tokens before the AWS STS AssumeRoleWithWebIdentity API operation can send the temporary credentials. As part of the Service Account Issuer Discovery feature of Kubernetes, EKS is hosting a public OpenID provider configuration document (Discovery endpoint) and the public keys to validate the token signature (JSON Web Key Sets – JWKS) at https://OIDC_PROVIDER_URL/.well-known/openid-configuration.
# Let’s take a look at this endpoint. We can use the aws eks describe-cluster command to get the OIDC Provider URL.
IDP=$(aws eks describe-cluster --name myeks --query cluster.identity.oidc.issuer --output text)

# Reach the Discovery Endpoint
curl -s $IDP/.well-known/openid-configuration | jq -r '.'

# In the above output, you can see the jwks (JSON Web Key set) field, which contains the set of keys containing the public keys used to verify JWT (JSON Web Token).
# Refer to the documentation to get details about the JWKS properties.
curl -s $IDP/keys | jq -r '.'

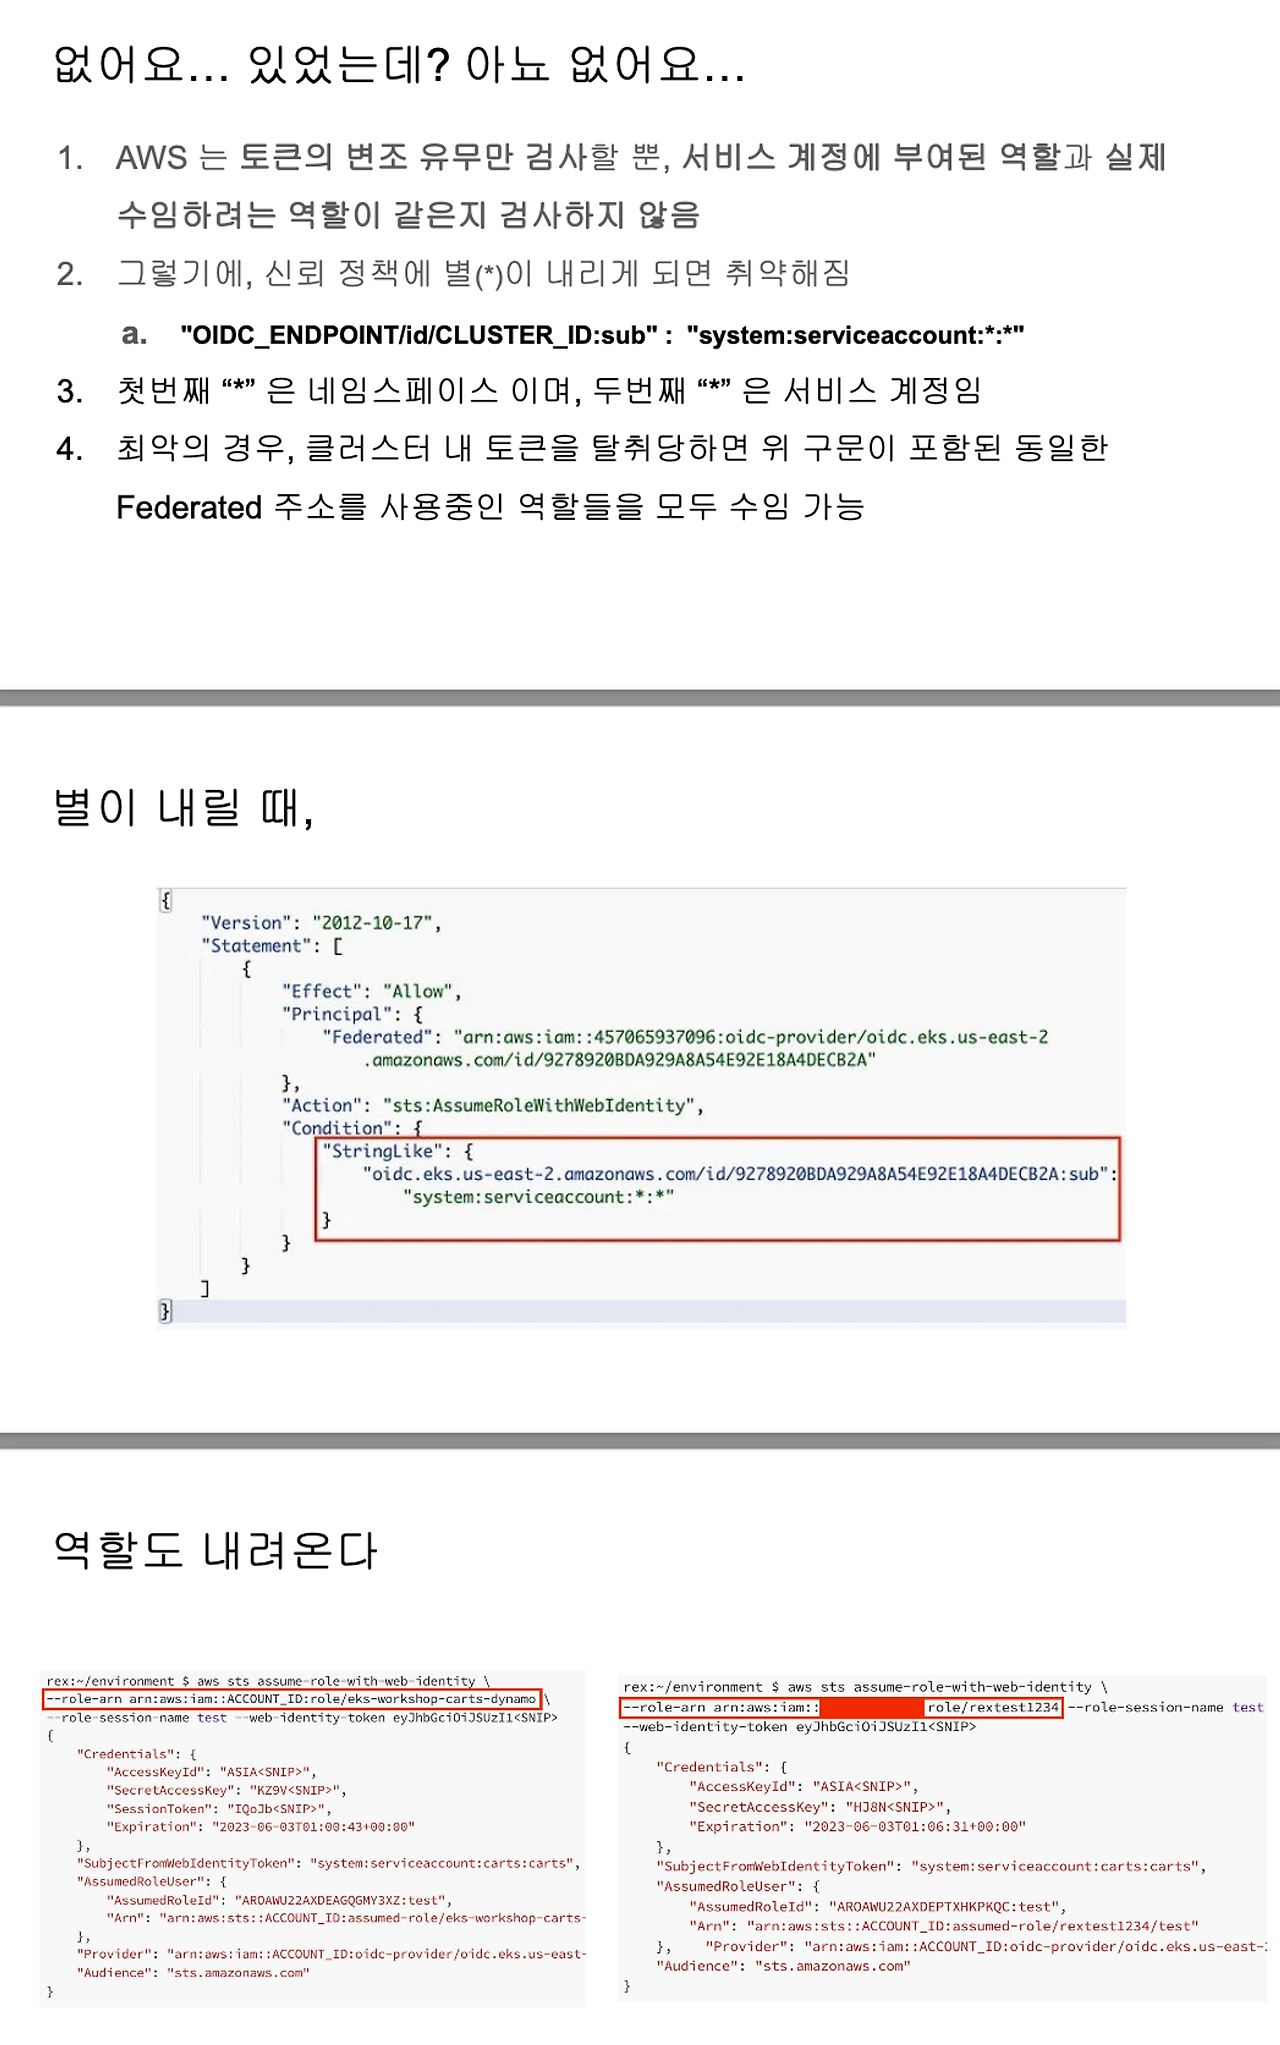
- IRSA를 가장 취약하게 사용하는 방법 : 정보 탈취 시 키/토큰 발급 약용 가능 - 링크
- AWS는 JWT 토큰의 유효성만 확인 하지만 토큰 파일과 서비스 계정에 지정된 실제 역할 간의 일관성을 보장하지는 않음 → Condition 잘못 설정 시, 토큰과 역할 ARN만 있다면 동일 토큰으로 다른 역할을 맡을 수 있음


- IAM Channelge Level 6 문제
# AWS_WEB_IDENTITY_TOKEN_FILE 토큰 값 변수 지정
IAM_TOKEN=$(kubectl exec -it eks-iam-test3 -- cat /var/run/secrets/eks.amazonaws.com/serviceaccount/token)
echo $IAM_TOKEN

# ROLE ARN 확인 후 변수 직접 지정
eksctl get iamserviceaccount --cluster $CLUSTER_NAME
ROLE_ARN=arn:aws:iam::560412178918:role/eksctl-myeks-addon-iamserviceaccount-default--Role1-v3vQiOJaC9tn

# assume-role-with-web-identity STS 임시자격증명 발급 요청
aws sts assume-role-with-web-identity --role-arn $ROLE_ARN --role-session-name mykey --web-identity-token $IAM_TOKEN | jq

- I hope you have enjoyed this journey and now have a good understanding of what really happens behind the scenes when we try to access AWS services from Pods. We have seen how AWS credentials will default to the EC2 instance profile if the workload cannot find any credentials and how Kubernetes Service Accounts and Service Account tokens can be used to give Pods Identities. Finally, we have seen how IAM can use an external OIDC identity provider and validate tokens to give temporary IAM credentials.
- 실습 확인 후 파드 삭제 및 IRSA 제거
#
kubectl delete pod eks-iam-test3
eksctl delete iamserviceaccount --cluster $CLUSTER_NAME --name my-sa --namespace default
eksctl get iamserviceaccount --cluster $CLUSTER_NAME
kubectl get sa


